How do I know if I have an anterior pelvic tilt when I squat?
To check for an anterior pelvic tilt during squats, compare the position of the bottom edge of your ribs and the top edge of your pelvis to see if they are parallel to each other. Cross your arms over your waist at the softest part of your hip muscles and slowly move up to touch the bone at the bottom of your ribs and down to touch the bone at the top of your pelvis. Ideally, these two planes should be parallel. If they are not parallel, and your waist curve is too concave at this point, it indicates an anterior pelvic tilt.
Can’t get your butt to lift? Start by understanding the glutes
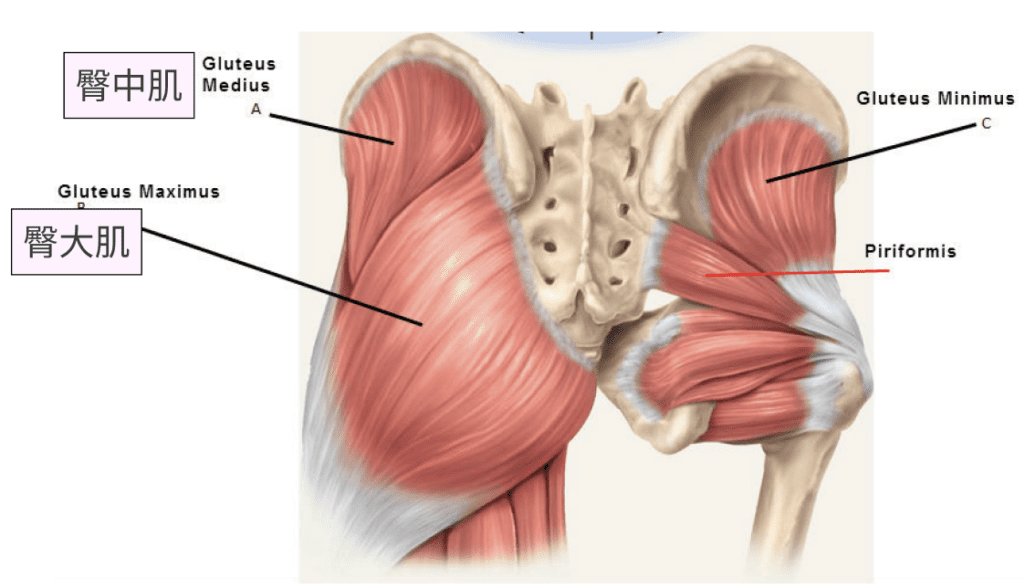
Many women aim to work their glutes and hamstrings to create a fuller butt and achieve tighter-looking thighs. To enhance the appearance of the buttocks from all angles, our workouts must target all muscle groups in the glutes. The “butt” is not just one big muscle but rather several, with the gluteus maximus and gluteus medius being the two muscle groups that significantly affect its appearance.
Gluteus Maximus & Gluteus Medius
Visually, the gluteus maximus primarily influences the fullness and firmness of the buttocks. On the other hand, the gluteus medius is located on the upper side of the gluteus maximus and contributes to a more rounded and lifted look. Functionally, the gluteus maximus is primarily responsible for hip extension, while the gluteus medius plays a crucial role in hip stabilization. Sedentary lifestyles and weak gluteal muscles often lead to back and knee pain. When working the glutes and hamstrings, in addition to performing hard lifts, squats, and hip-leg exercises, you can also incorporate some hip-holding circle-assisted glute training (e.g., crab walks, knee bends, lunges, etc.).

Image Source: Muscle Therapy Australia
Glute Warm-up
Before starting your glute workout, it’s essential to perform some warm-up exercises. These exercises activate the muscle groups you’ll be targeting, improve the connection between your brain and the target muscles, and enhance the overall sensation during the workout. If you lead a sedentary lifestyle, your gluteal muscles may be weak and difficult to contract due to prolonged inactivity. Spending a few extra minutes on warm-up exercises before your workout can improve your sensitivity and prevent the common issue of “working the legs but not the glutes” during glute training. If you’re unsure about how to warm up, check out Hana’s 3 warm-up moves!
Peachy Butt Schedule
Short on time? Try the 5-minute unassisted hip and leg workout at home.
Don’t have much time or worried about keeping up? Give the 5-minute hip and leg workout at home a try. One round takes only 5 minutes, and if you still have some energy left, you can do a few more rounds. It’s a quick and effective workout that you can easily fit into your busy day!
The intermediate 15-minute home workout is suitable for any time you prefer!
In this schedule, I’ll show you four hip and leg workouts that require no equipment! Each move has three variations: a free-hand version, a bungee cord version, and a hip-hugging ring version. These workouts offer alternatives to the exercises you typically do at the gym.
Bookmark this post and follow this schedule the next time you can’t make it to the gym. You can still break a sweat and get an effective workout in the comfort of your home!
Advanced Gym Workout Schedule (Including Supersets and Unilateral Training)
If you’ve been working out for a while and have tried various gym workouts and YouTube videos, but you still feel like you want more advanced workouts, give Hana’s new “Metabolic Resistance Hybrid Plyometrics (4.0)” a try! This program offers challenging exercises that will take your fitness routine to the next level.
Recommendations for Stretching After Hip and Leg Workouts
Why Stretch After a Workout?
- To relax tight muscles
- Accelerate the removal of waste products from the body after exercise
- Increase blood flow to the muscles and speed up lactic acid metabolism
Stretching after hip and leg workouts is a crucial part of improving performance, maintaining muscle elasticity, and optimizing recovery, but it’s also an aspect that many individuals overlook. If you want your glutes to look better and recover faster, remember to stretch your glutes after your workout!
Lower Extremities Fascial Relaxation
When you work your muscles, the myofascia becomes relatively tense, and if you don’t relax after your workout, it can remain tight. Over time, the fascia can lose its elasticity, resulting in a feeling of stiffness or tension in your body. Additionally, training may target only specific muscle groups or create imbalances between the left and right sides of your body. At this point, fascial release can be used to bring your body back to a balanced and symmetrical state, minimizing the risk of future injuries.
Principles of Fascial Release
Not the tighter the stretch, the more effective it is: Stretching the fascia too tightly may lead to decreased elasticity or even small tears. To be effective and safe, stretch until you feel slight tension.
Don’t stay in a stretch for too long: To maintain fascial elasticity, it’s recommended not to hold a stretch longer than 20 seconds. Alternatively, you can use dynamic stretching, involving stretching, short rest, and then returning to the starting position, repeated stretching can maintain the elasticity of the fascia.
Try to relax different muscle groups: Target different muscle groups, such as the buttocks, posterior thighs, anterior thighs, lateral thighs, and calves, to restore the balance of fascial tension and prevent certain areas from becoming persistently tense.
Use a roller or massage balls: Utilize a roller or soft massage ball to press and stretch tight points of fascia effectively for relaxation.
If you have been unable to improve your glutes, you may have the following problems:
You squat a lot but still can’t lift your hips. Do you have an anterior pelvic tilt?
How can you tell if you have an anterior pelvic tilt when you squat?
Compare the position of the bottom of your ribs and the top of your pelvis. They should ideally be parallel to each other. Cross your arms over your waist at the softest part of your hip muscles and slowly move up to the bone that is the bottom of your ribs and down to the bone that is the top of your pelvis. If they are not parallel and your waist curve is too concave at this point, you might have an anterior pelvic tilt.
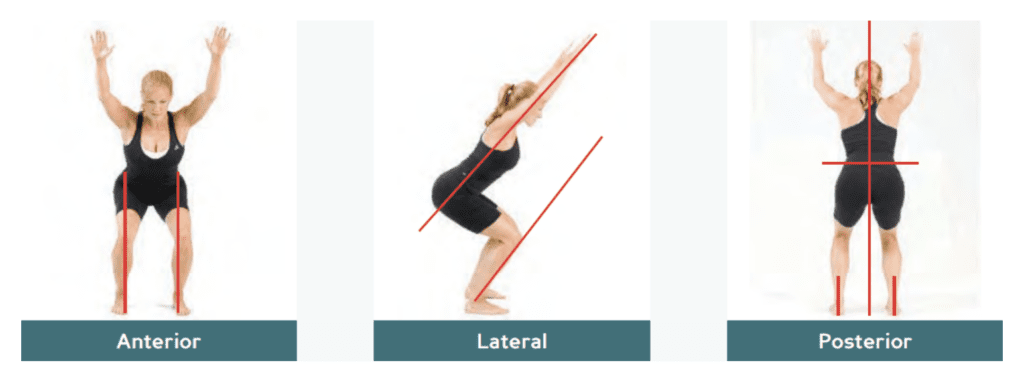
Squat Movement Checklist

| Front | Back | Side |
| Check if the trunk is kept in the center of the legs. Are the hip, knee, and ankle joints in a straight line? | Is the pelvis between the feet? Can you see the outside of the knee? | Observe the sequence of movements. Is the knee significantly higher than the toes? |
How do you select exercise weights and measure exercise intensity?
When encountering new equipment and unfamiliar movements, it is recommended that you first “use the lightest weight possible,” moving your joints to familiarize yourself with the movement path. Afterward, adjust the weight according to your training goals.
Start with the lightest weight and then adjust the resistance based on your body’s feedback. Try 2-3 repetitions with the new weight and then adjust further to find a weight that allows you to complete the desired number of training repetitions while still feeling strain at the end of the set (RPE 7). You should be able to complete all the repetitions with correct posture (RPE 8~10) to ensure the desired training effect and muscle stimulation. Avoid weights that are too light, as they may not provide sufficient challenge for effective training.


